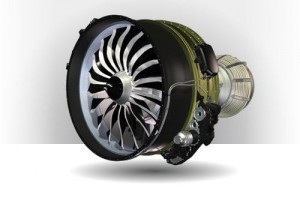
GE Aviation expects to chop off about 25 percent of the total 3D printing time of metallic production components for its LEAP (Leading Edge Aviation Propulsion) Turbofan engine. That’s pretty amazing, considering how slow the build times usually are for additive manufacturing (AM) techniques. The secret lies in some in-process inspection technologies GE Aviation will jointly develop with Sigma Labs.

Sigma Labs introduced a new in-process inspection technology called PrintRite3D last fall, which it developed for inspecting and verifying metal production parts with complex geometries made with AM. Parts verification and process repeatability and reliability are especially important in complex aircraft production with multiple parts that require certification.
That’s especially true for metal parts made with AM, which must meet more demanding specifications than additively manufactured plastic parts. To successfully use AM techniques in volume production of metal aircraft components, the two potentially conflicting goals of extremely high accuracy and repeatability, and speed of production, are both necessary.
Other efforts to achieve these apparently incompatible goals include in-process inspection techniques being jointly developed by Stratasys and Oak Ridge National Laboratory. That agreement aims at developing processes based on Stratasys’s FDM (fused deposition modeling) that can create high-reliability production volumes of carbon fiber composite components for aircraft. The project is attempting to make 3D printers faster and more reliable by ensuring dimensional and mechanical repeatability, via in situ closed-loop controls within the machines themselves.
When metal parts are additively manufactured, it’s been GE Aviation’s experience that post-production finishing can take a long time, a GE Aviation spokesman told Design News in an email. “The post-production finishing processes, which includes inspection, takes about 30 percent of the total additive production time,” he said. “Finishing processes aren’t being eliminated with this new technology, but by assuring part quality during the build of the part, we can shave up to 25 percent off the production process time.”
The inspection processes developed by the two companies will help assure build quality and repeatability of metallic parts for the LEAP and other aircraft engines by verifying their geometry and quality. GE already uses direct metal laser melting (DMLM) AM techniques for some engine components, and expects to use these for some LEAP engine metal parts, such as the fuel nozzle.
For non-additively manufactured parts, GE Aviation has primarily used X-ray inspection, but there’s no existing standard for deploying it as an inspection technique for verifying correct dimensions, the spokesman told us. “With these engine components being so complex, that’s the primary reason we use X-ray. There is no ultrasonic way to inspect the part and ensure quality,” he said.
Source: http://www.designnews.com/author.asp?section_id=1392&doc_id=264282&itc=dn_analysis_element&


